TaraStack Manual
For anyone who has already stacked a planetary video: the first steps, then what every slider does and when to touch it. Leggi in italiano.
Contents
First Steps
- Open a video. Click Open video… or drop the file on the window. SER and uncompressed AVI, mono or colour. MOV, MP4 and compressed AVI need ffmpeg.exe and ffprobe.exe next to TaraStack.exe (or in the PATH). Drop three or four files at once (R, G, B, and optionally L) for a colour composite: TaraStack guesses the channel from the file name, and you can correct it from the list that appears.
- Wait for the analysis. TaraStack reads the whole video once, finds the planet (or recognises a lunar or solar surface) and scores the sharpness of every frame. The bar at the bottom shows the progress; then the quality chart appears.
- Look at the chart and choose the frames. Narrow the range with From frame / To frame if part of the video is bad (clouds, a bump, the planet drifting out), then choose Frames used, or press Use suggested.
- Start stacking. It takes from a few seconds to a few minutes, depending on how many frames you use. Cancel stops it.
- Sharpen. The view switches to Dewarp stack + sharpening. Move the sharpening sliders: the image updates live, without stacking again.
- Save. The 16-bit TIFF for your own processing, the PNG of what you see, and Save parameters to find everything again next time.
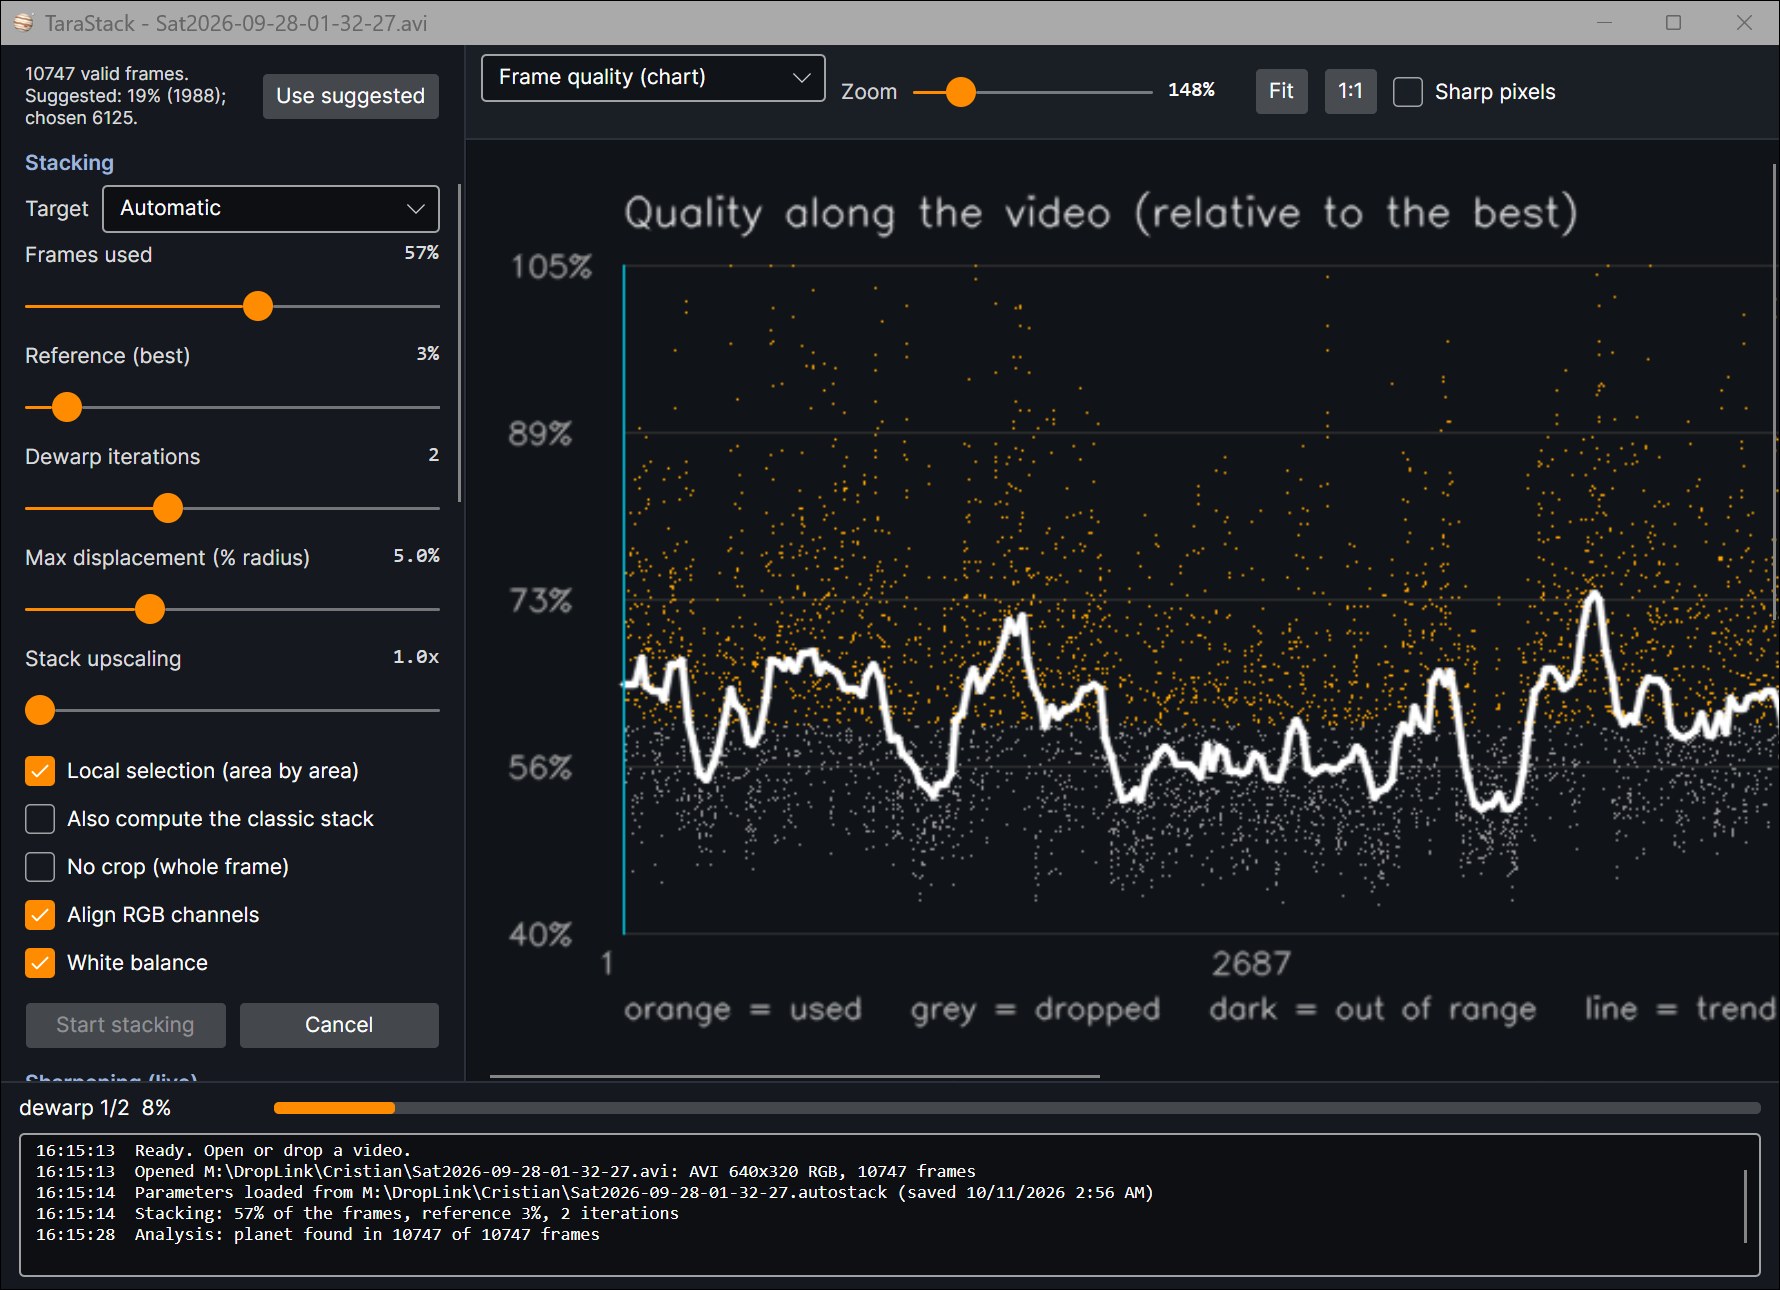
After the analysis: the quality of every frame along the video, and the frame selection on the left.
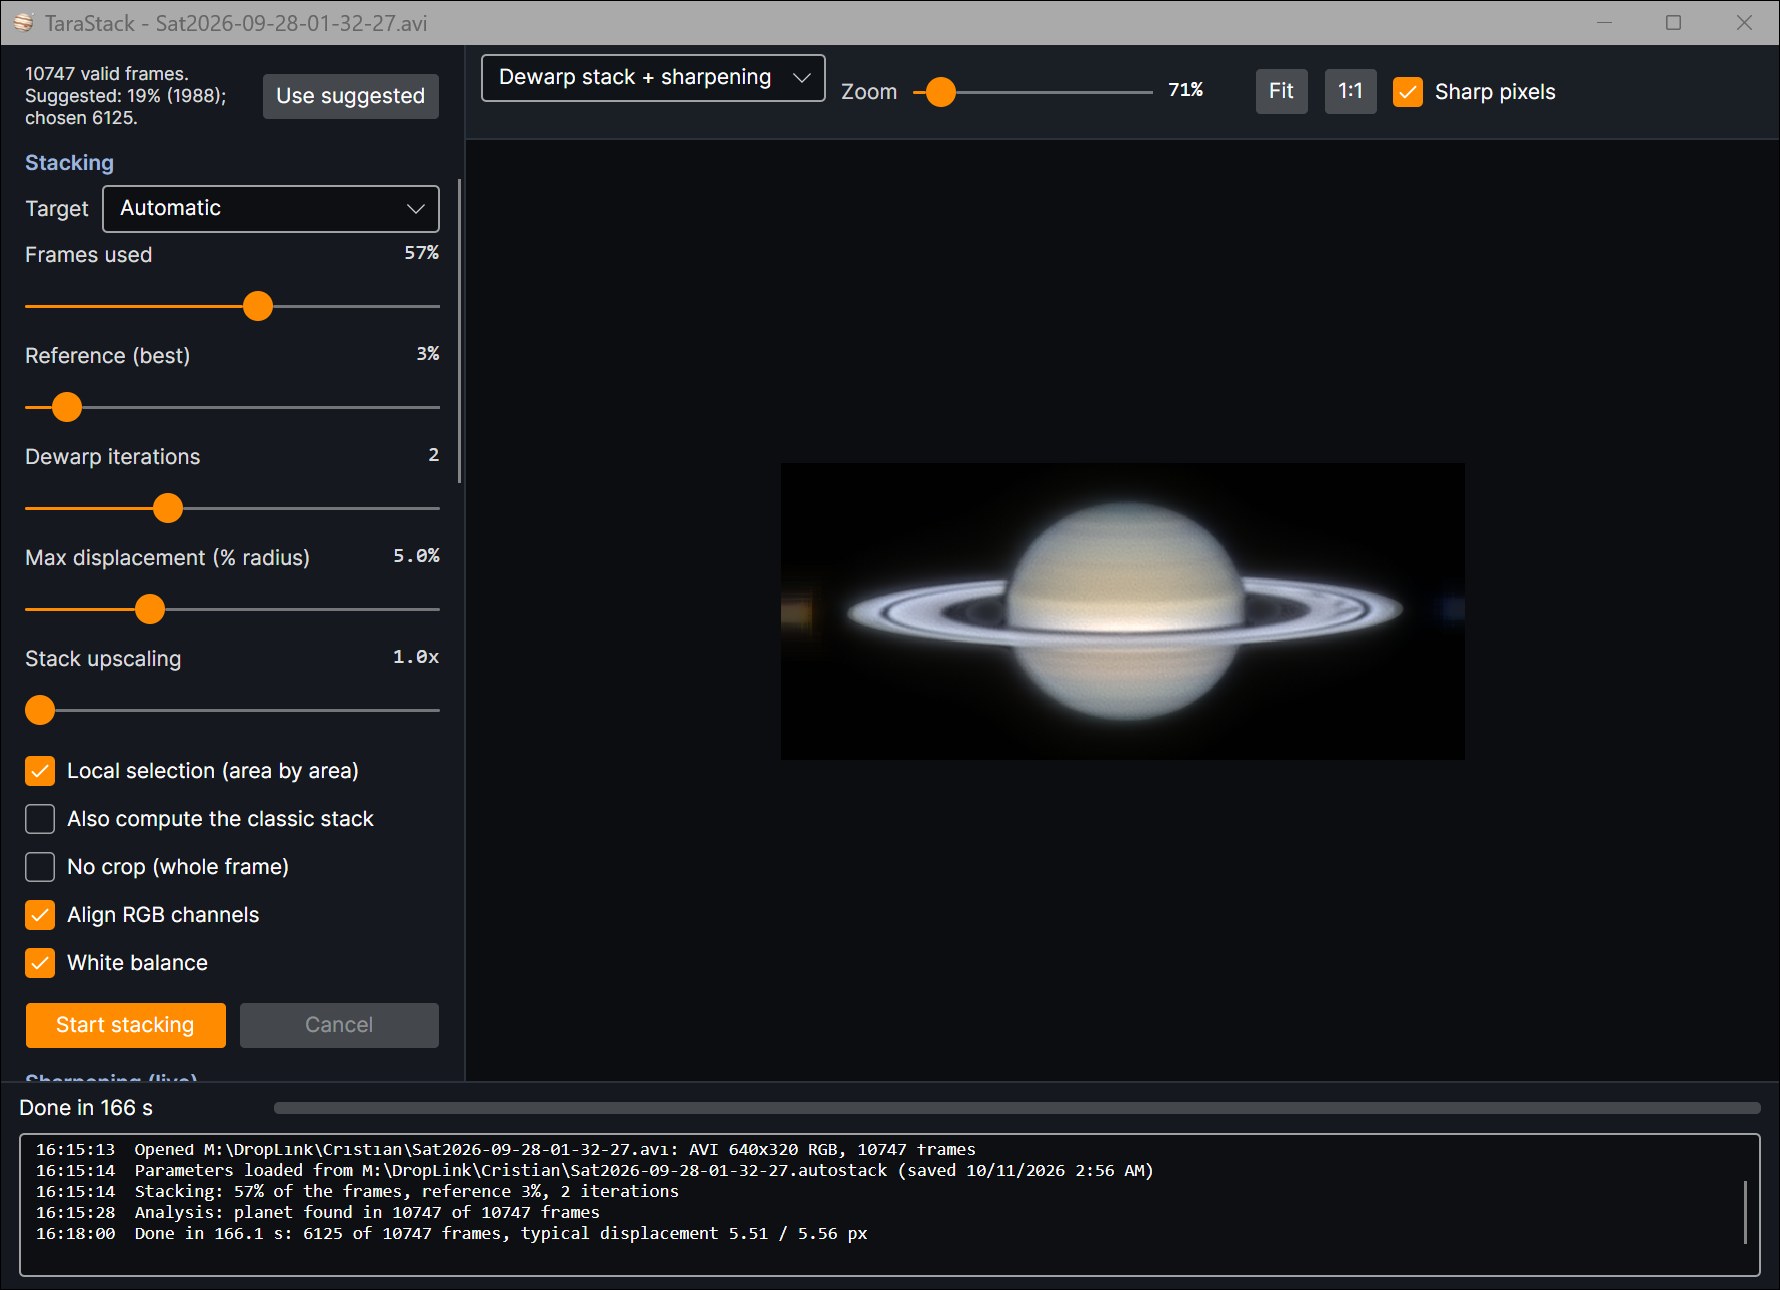
After stacking: the sharpened result. The log at the bottom says how many frames were used and how much the seeing moved them.
The Views
The menu at the top left of the viewer chooses what to show. Zoom, Fit and 1:1 change the size (Ctrl + mouse wheel works too); Sharp pixels shows the pixels without smoothing when you zoom in.
- Original video (frames): the frames of the video, with a slider to scroll through them. The detected disk is drawn in green, in red when it touches the edge of the frame. The line under the image tells the quality of the frame and whether it is (or would be) used.
- Frame quality (chart): top, the quality along the video (orange = used, grey = dropped, dark = out of range, white line = trend). Bottom, the same qualities sorted from best to worst, with your choice and the suggested one.
- Dewarp stack + sharpening: the result, with the sharpening applied.
- Dewarp stack (linear): the result before any sharpening, the same data saved in the TIFF.
- Classic stack, Best-frames stack and Comparison: only if Also compute the classic stack is on. The classic stack is the usual shift-and-add of the same frames; the comparison puts it side by side with the dewarp stack, with the same sharpening.
- Best frame: the single sharpest frame, to see how much the stacking gained.
- L, R, G, B channels: in a colour composite, each aligned channel on its own.
- Moons: after stacking, circles and numbers the moons found in the stack. On screen only: saved files stay clean.
Frame Selection
From frame / To frame
The part of the video to use. Leave out clouds, bumps of the mount, or the end of a long video in which a planet has rotated too much.
Use suggested
The suggestion is the "knee" of the sorted quality curve: the point after which frames get clearly worse. It is always between 2% and 50%. Good as a starting point; then try a little more or less and compare.
Stacking
These settings need a new stacking to take effect.
Target default: Automatic
Planet: a disk on a black sky; it is found in every frame and the image is cropped around it (rings included). Surface (Moon, Sun): a close-up that fills the field; the whole frame is used and its drift is followed. Automatic decides from the first frame; force it if it gets it wrong (for example a crescent Moon with a lot of black sky).
Frames used default: 10%
The share of the best frames, within the range, that goes into the stack. More frames = less noise but more blurred frames. With good seeing and a long video 20–50% works well; with poor seeing stay low. The dewarp corrects the deformation of the frames, so it tolerates more frames than a classic stack. The reference is taken from the best frames in the middle third of the range, so that the planet’s rotation smears the detail less.
Reference (best) default: 3%
The share of the very best frames stacked to make the first reference, the image every frame is straightened against (at least 20 frames). Raise it with noisy videos, lower it if only a few frames are really sharp.
Dewarp iterations default: 2
How many times the reference is rebuilt from the straightened frames and the frames straightened again against it. Each pass makes the reference sharper and the correction more accurate. 2 is a good balance; 3 or 4 gain a little more, and each pass costs about as much as the first.
Max displacement (% radius) default: 5%
How far a part of a frame may be moved to straighten it, as a percentage of the planet's radius. Raise it with bad seeing, when details visibly jump around between frames; lower it if the result shows strange smears or doubled features.
Stack upscaling default: 1.0x
1.5x or 2x: the frames are accumulated on a finer grid, so their sub-pixel offsets add real resolution (like a drizzle or the resample of other stackers). The result goes back to the original scale before sharpening, so the image keeps its size. Useful for undersampled videos (a small planet on few pixels); slower and with more memory.
Local selection (area by area) default: on
A frame can be sharp on one side of the disk and blurred on the other. With this on, every area of the image uses only the best half of the used frames in that area. It usually gives more detail; turn it off to compare.
Also compute the classic stack default: on
Also makes the classic shift-and-add stack and the best-frames stack, for the comparison views. Turn it off to save a little time.
No crop (whole frame)
Keeps the whole frame, re-centred on the planet. Moons in the field are aligned one by one, each with its own correction of the seeing.
Align RGB channels default: on
Corrects the shift between red, green and blue caused by atmospheric dispersion, which gives coloured fringes at the top and bottom of a low planet. Turn it off only if you used an ADC that already removed it.
White balance default: on
Removes the colour of the sky background and makes the planet neutral on average. Then refine with Red and Blue. Turn it off for objects that are not neutral, or if you want to balance the colour yourself.
Sharpening
These sliders act live on the finished stack: no need to stack again. The order of the operations is: deconvolution, then wavelets, then colour and tone.
A good routine: start from Defaults; set Detail scale until the bands are well drawn; add deconvolution gently; raise Fine detail only as long as the noise stays acceptable; then saturation and midtones. Zoom to 1:1 to judge.
Deconvolution: radius default: off
Richardson-Lucy deconvolution: it "undoes" a blur of the given radius (in pixels). Typical values 0.8–1.5 px. Too large and dark or bright rings appear around edges and the noise grows. It works best on stacks with many frames.
Deconvolution: iterations default: 30
How strong the deconvolution is. More iterations = more detail, but also more noise and ringing. 30–80 is a good range; with many frames and a clean signal you can go up to 200 to see how far the image holds.
Detail scale default: 0.7 px
Not a strength but a size: the size in pixels of the finest wavelet layer (0.7 px by default). The other layers follow at twice, four and eight times that size: with 0.7 they work at about 0.7, 1.4, 2.8 and 5.6 px. So it moves all four detail sliders together: at 1.5 they work at 1.5, 3, 6 and 12 px. Raise it for oversampled videos (long focal ratio) or soft stacks, so that Fine detail sharpens real detail and not noise; keep it low for sharp, well sampled videos. First choose the scale (the size you work at), then the four sliders (how much each layer is pushed).
Fine detail / Medium detail / Structures / Large-scale contrast default: 4 / 4 / 2 / 0.5
How much each wavelet layer is strengthened, from the smallest to the largest. 0 leaves that layer as it is. Fine detail sharpens the smallest features but also the noise; Medium detail is the most useful for festoons, spots and the Cassini division; Structures brings out belts and zones; Large-scale contrast acts on the whole disk, a little goes a long way. Fine and Medium detail go up to 20, Structures up to 10.
Noise reduction default: 0.4
Cleans every wavelet layer of the variations smaller than the noise level measured in that layer, before strengthening it. 0 = off. Raise it if the sky or the disk become grainy; too much flattens faint details.
Saturation default: 1.6
Colour intensity: 1 leaves it as stacked, 0 is black and white.
Red / Blue default: 1.0
Manual colour balance on top of the automatic one: multiplies the red or blue channel. Applied to the view, to the PNG and to the TIFF.
Midtones (gamma) default: 1.0
Above 1 brightens the midtones (shows more on a dark limb or on the rings), below 1 darkens them and increases the contrast. Colours are not changed.
Luminance only (no colour fringes) default: on
Deconvolution and wavelets work on the brightness, and the colour comes from the stack: no coloured edges and no colour noise. Turn it off only on very clean stacks to sharpen each channel separately.
Protect the limb (no rim or halo) default: on
Near the edge of the planet the sharpening is kept within the brightness of the original image, so no bright rim or dark ring appears around the disk. Not used on lunar and solar surfaces.
Defaults
Puts back all the sharpening sliders to the starting values (the stacking settings are not touched).
Saving
- 16-bit TIFF stack (no sharpening): the linear result, for processing in your favourite tools.
- Displayed image (PNG): exactly what the viewer shows, sharpening included.
- Save parameters: writes NAME.tarastack next to the video, a small text file with every setting. When you open the same video again it is loaded automatically; Load parameters… applies a saved file to another video, for example a whole night of the same planet.
Tips
- Judge at 1:1. At large zoom every stack looks soft, at small zoom every sharpening looks good.
- Compare. Keep the classic stack on and look at Comparison: it shows what the dewarp gained on your video.
- Long videos of Jupiter: the planet rotates; use one or two minutes at a time (From/To frame) and derotate the results with your usual tools.
- The Moon and the Sun: if Automatic takes a crescent for a planet, choose Surface. Protect the limb does not apply.
- The planet is not found: check in the Original video view that the disk is drawn in green; a red circle means it touches the edge of the frame in that frame.
- Language: the interface follows Windows (Italian or English); change it under Lingua / Language.
What Happens Inside
- Every frame gets a sharpness score, measured after a slight blur so that the noise does not count as detail.
- The best frames (Reference) are aligned and stacked: this is the first reference.
- For every used frame, the local displacement against the reference is measured at every point (optical flow), limited by Max displacement, and undone. Each frame is resampled only once.
- With Local selection, every area is stacked from the frames that were sharpest there.
- The new stack becomes the reference and the process repeats (Dewarp iterations).
- Colour channels are aligned and balanced; then the live sharpening is applied to what you see.